Hey guys, I've been thinking for a while that I want to make my blog a more regular thing. And I quite like the idea of giveaways.
Problem is, I don't have any followers in order to have the giveaway haha!
If you do happen to see this post, please feel free to follow! A giveaway to me is not really viable if hardly anyone participates haha!!
Go forth little craftsters, and share, re-blog, +1, shout from buses, just tell someone!!
Friday, 3 October 2014
Sunday, 28 September 2014
I did it!
Well, you all know I've been at uni for what seems like forever, but I finally graduated this week!
Best of all, my husbands graduation was on the same day, so we were able to get some photos of us both in our gowns which was lovely.


Best of all, my husbands graduation was on the same day, so we were able to get some photos of us both in our gowns which was lovely.
Our graduation was on Plymouth Hoe, so of course we had to get Smeatons Tower in our pics!
It feels awesome so have finally finished uni, it's been the hardest thing I've ever done.
Oh, yes that is the dress I refashioned a few posts back :) I got some compliments which was nice!
Speak soon!
Nude nails and heart tutorial...
Hey guys!


Just a quickie today, I'm going to show you how to get nude nails with little black hearts!
Firstly, paint your nails in a nude shade you love. You could also do any colour you like, but I think using a pastel/nude colour looks sophisticated for work.
Next, dab a small puddle of black nail varnish. I've learnt to only have a small puddle at any time. You can always put more down, but you can't scoop it back up if you use too much.
Then, using a nail dotter...
Small note, I did another post on how to make your own nail dotter. Do check it out! But since then I found a pack of 5 on Amazon for 1p!! Since it cost the earth (haha!) I treated myself. Bargain!
Anyway... Using a nail dotter, make two dots. These will be the top curves of the heart.
Add in another dot at the bottom. Join this dot, to one of the top dots.
You now have half a heart!
Now join the bottom dot to the other top dot.
You now have a heart!!
Neaten up any edges with the dotter, and wait to dry. Wait more than you usually would, as the hearts are quite dense with nail varnish. You don't want them to smudge!
When dry, put on a top coat to level everything out.
BEAUTIFUL!
Until next time!
Thursday, 18 September 2014
Graduation dress...
I've been a busy bee lately! I have made countless items of ACTUAL WEARABLE CLOTHES! Not just dresses either, everyday skirts and blouses too. I've also done a lot of re-fashions. Here is one I bought this week for £1...


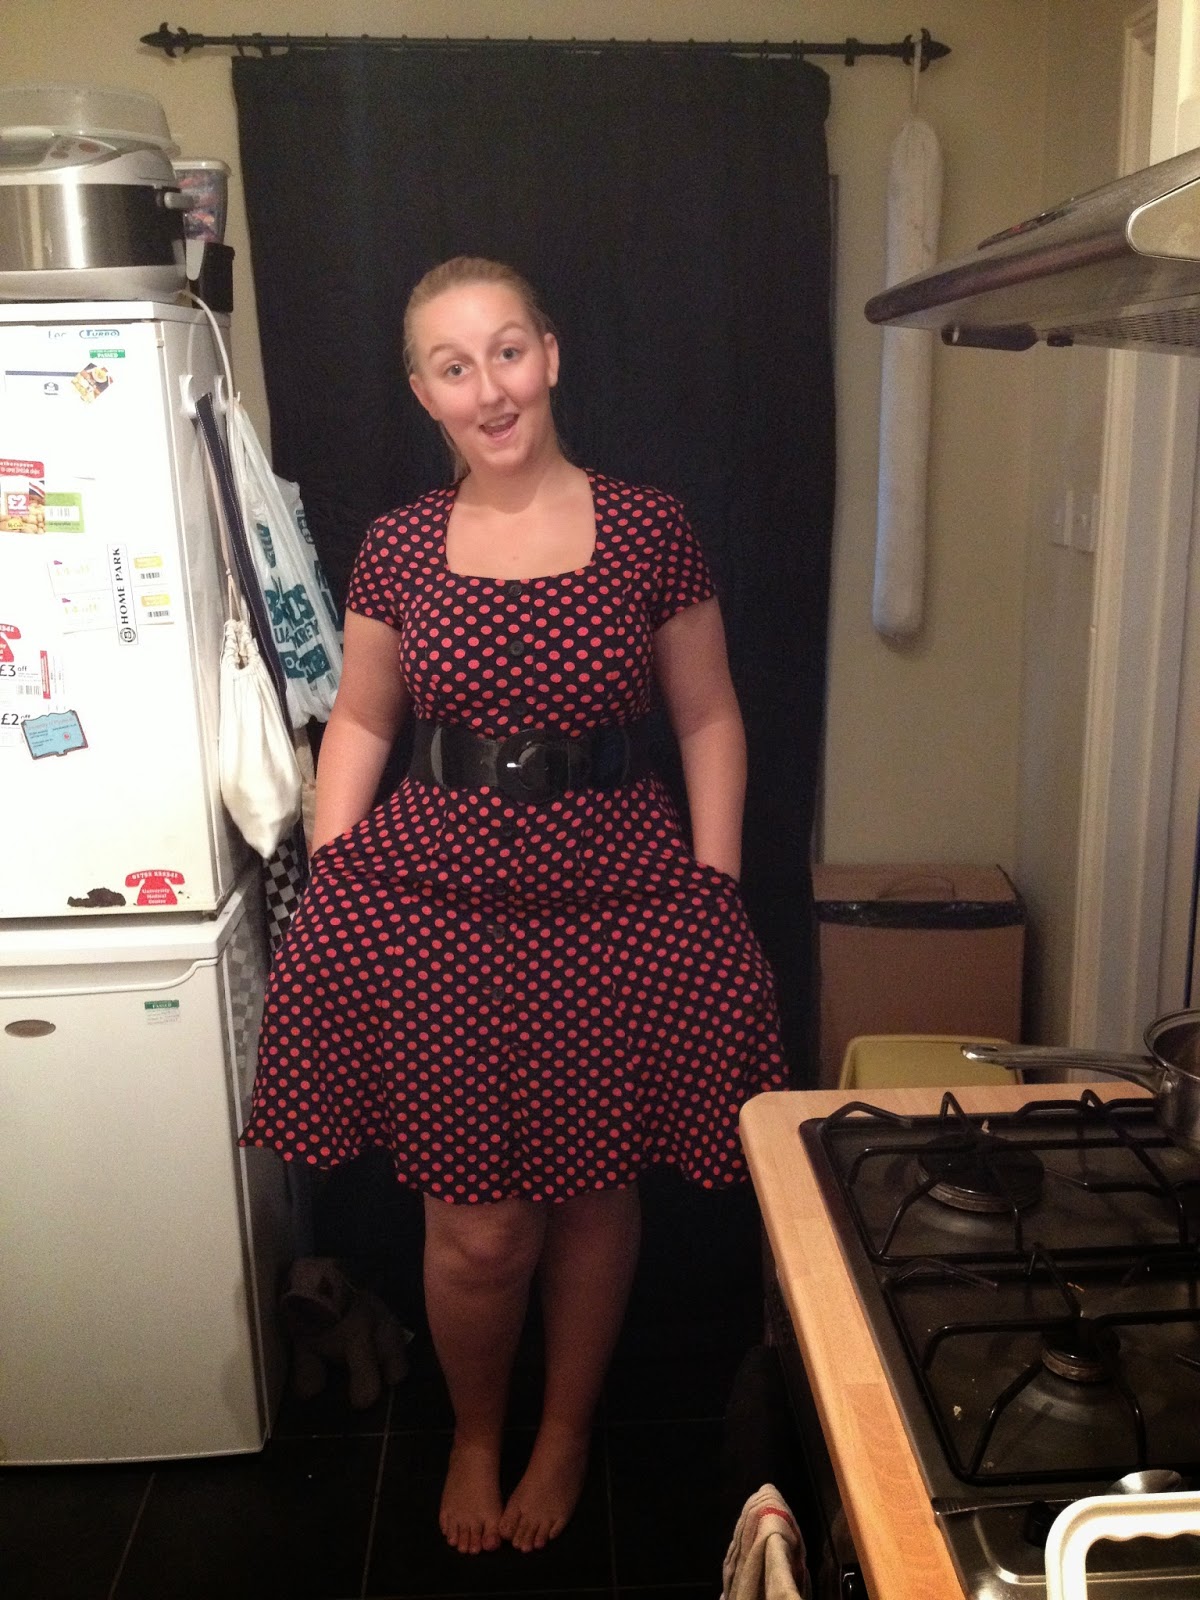

This far too long black and red polka dot dress! Miraculously, not a bad fit :) But the poor unloved dress had hundreds of moth holes and tiny little tears. It also had some lovely shoulder pads haha! I didn't take pics of the moth holes because there were so many of them, I would still be there fixing them now!
Anyway, as the fit was fine, I simply cut the bottom of the dress into a slightly dipped hem (to help cover my ginormous bum!!), fixed the holes and tears, and also stitched up the button holes. As a lady with a larger top half, button down dresses and tops tend to gape and show everything off haha!
Oh, and it has pockets!!
Look how flowy it is!!
I had kind of forgotten that my graduation is next week, so how lucky was it to come across this dress? I actually saw it as I was on my way out of the shop! And for £1?! I will be the cheapest dressed person there, and I won't even care because I made it look awesome :D
Until next time :)
Saturday, 9 August 2014
A rare review...
A short one today.
I don't normally do reviews, but I feel this one is worth it!
I finally got round to buying Love at First Stitch by Tilly Walnes ( of Tilly and the buttons and the first series of the Great British Sewing Bee) . I was expecting great things, and it delivered!
The book features patterns, tips and skills, beautiful photos, beautifully designed pages, and much more!
Head on over to Tilly's blog to learn more, or just buy it! You won't regret it!
Wednesday, 6 August 2014
I branched out!...
Ok guys, I have been suuuper busy on the craft front recently. making lots of clothes for myself which is nice :) I have also decided to venture onto etsy. So please do have a gander at my shop and tell me what you think, or what I should list there, that'd be great!!
Here's the link: https://www.etsy.com/uk/shop/WhyDidIMakeThat?ref=s2-header-shopname
You may need to copy that into your browser bar, I'm not so tech-savvy, did know how to make it clickable haha!
Oh, by the way, I do plan on updating you all with this crafting malarkey I've been doing. It just happens that I work all day, then I craft in the evening, so there's never any decent lighting around. I will do it soon. Promise :)
Byee!
Tuesday, 10 June 2014
Spotty nails...
So, as you may or may not know, at uni I tend to use glue a lot. Glue melts nail varnish. I haven't been able to have pretty nails for nearly 3 years! Since I finished a couple of weeks ago I've been painting them a different colour/style every other day. So I figured, why not do a blog post?


Today, I have spotty nails.
I thought it'd be difficult, considering I haven't got any professional tools or anything like that. But it was simple once I realised I could make my own dotting tool out of things I already had.
I've seen dotting tools on ebay for about £5 a set. But I just used a pin and a spare rubber. Everyone has a spare rubber. I've also seen this done with the end of a pencil - it works the same, you just stick the pin in the rubber at the end of the pencil. I've also heard that the lead-end of a mechanical pencil is good for super small dots, I am yet to try this though.
Anyway, the process is fairly simple. Start with a couple of coats of a nail varnish that you like.
(I did one more coat after this picture was taken.)
Then pour a little bit of a complimentary (or contrasting, whichever you prefer) nail varnish onto a bit of paper. I just leave the brush out of the pot, and take the paint from that. But that's because I do it fairly quickly and the paint doesn't dry up. For your first try I would pour it out. ONLY POUR A LITTLE BIT! You can always pour more, but you can't get it back in once you've poured it!
Dot away! I prefer close dots, I have also done spaced dots, one dot etc etc. You can google 'nail designs' and hundreds and hundreds of pictures will inspire you!
One more time, as it is so pretty :)
Subscribe to:
Posts (Atom)