Showing posts with label first. Show all posts

Friday, 7 November 2014

Newy newness...

Got lots to show you today!


I made a lovely shabby chic pillowcase, I even experimented with 
decorative zig-zagging to applique the letters onto the case.


And I made a few of these knitted phone cases :)
I came up with the pattern myself, I love how it looks woven.

Ooh, and I made a Facebook page in addition to this blog and my Etsy shop. I won't be abandoning you though!


Is anyone else feeling Christmassy all of a sudden? I think now that it's gotten colder, I feel waaay more festive. Any Christmas makes on the go?


DON'T FORGET! The 10% off Etsy code is still live - PROMO1
In case you missed those links....

Tuesday, 4 November 2014

Etsy sale!

Just thought you lot ought to know...

I HAD MY FIRST ETSY SALE! 

I'm so very happy :) 


Sunday, 19 October 2014

Is a discount code on the horizon?

Hello guys!

Now, I get so excited when I see that some of my favourite bloggers have released a special discount code for their blog fans....I am thinking of doing the same!

Follow the blog, get on over to my Etsy shop and follow that, and when I have 20 of you lovelies following me, I will release my first ever discount code!!

Who knows, if more than 20 people follow, there might be more to come!!!

Christmas is coming, so why not head over to my Etsy shop to have a look at some decorations and gifts?

Just in case you missed it, here it is again!

www.etsy.com/shop/WhyDidIMakeThat

Sunday, 12 October 2014

Delphine skirt in Love at First Stitch by Tilly Walnes...

This is the last of those 9 projects I showed last week!


The Delphine skirt is a pattern by Tilly Walnes at Tilly and the Buttons.
http://www.tillyandthebuttons.com/  
She was also on the sewing bee if you remember! 

The pattern was also featured in her lovely book, Love at First Stitch...


The skirt was also featured on the front cover! Proof of how lovely it is!


Here it is. I made a simple version just to get to grips with the pattern. It's rare that I stick to the pattern entirely, but I trusted this would be a good one, so I tried extra hard to be faithful to the instructions. Here are some detail pictures of the skirt...


The waistband,


Ok so The pattern called for an invisible zip. I didn't have one. So I stitched in a regular zip, and put a flap over it. Guess I didn't stay as true to the pattern as I'd hoped!


I also added a hook at the top to prevent the flap from literally flapping around!


I fully lined the skirt, as the cotton I was using wasn't sturdy enough for the A-line shape. 


I used french seams on the entire skirt for two reasons. 
1. To add to the strength of the garment. 
2. To enhance the A-line shape.


I did have to add some darts on the hips. I'm rather overly blessed on the bottom half, and I had to grade between two sizes. I wasn't sure what to do on the hips as mine are awkwardly sized. But adding in a dart wasn't an issue for me.


Fitting in the waistband facing to the zip wasn't as neat as I wanted it to be. 
But there's always next time!


I loved making this pattern, and I will definitely be making it again. I'll even allow you to see a photo of me wearing it!


Apologies for the bad poses/photography/lighting etc...I took the pics whilst staying at a hotel for the Grand Designs show, where my skirt made its debut appearance :)

Now the question is, do I add some buttons to this? I've got 6 round gold buttons ready to go on, but I don't know whether to just leave it as it is, and make another one....or to alter this one? Any ideas?

Until next time!


Tuesday, 7 October 2014

First ever pair of trousers! And second...

Hello! 

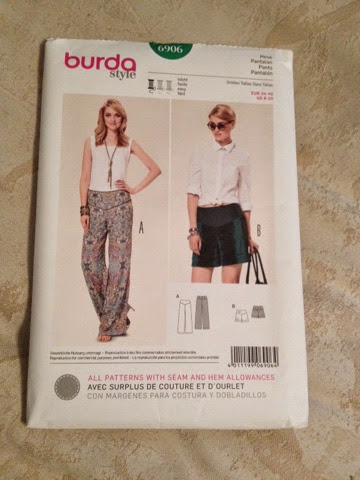
Continuing with the 9 projects I showed you last week, here are my first (and second) ever pairs of trousers! 


Now these trousers started their lives as a duvet cover that I bought for £1!!! When I got home and fully unfolded it, I discovered that the other side was a different pattern, and I liked it more than the initial pattern!

I used this pattern...
 When I bought it, it was half price, so I only paid £2.50, inc postage! Such a bargain project so far :)

It was an easy see, but had a few new techniques for me. It involved piping, an invisible zipper, and dealing with a crotch rise. 


Luckily the duvet had piping on it! So it was ready made and in a colour that complimented the pattern. 


My first ever invisible zipper!! 

I loved these trousers so much, and the pattern was so lovely - Simple yet enjoyable, so I decided to make another pair!! 

 Second ever zipper! I wasn't too bothered about pattern matching for these, I was limited to how much fabric (duvet) I had so I didn't want to waste any. 

I also made some pockets that I based on a pair of pyjama bottoms I have. 


I now love them both so much! I have worn them to death this summer, hence why I've not managed to do a post yet! 

Which pair do you prefer? 

Wednesday, 16 October 2013

An actual wearable item of clothing!

Hi guys! So I've not had much time for crafts lately, final year at uni and 11 weeks until my wedding is just consuming every waking minute right now. BUT! I had a spare evening last week so I decided to knock something out that I've wanted to do for ages...


(not the best pic, hastily taken in the mirror with my new camera that I still don't know how to use!)

Ok, so this may not look like the most technical blouse ever, but it had a lot of elements that I wanted to try. I've made clothes before - I used to make those massive dresses you see in old western re-enactments, but a lot of those techniques are different to what we do nowadays. 


(what I often made. Gorgeous pattern)

I've made clothes for myself before as well, but they were things like summer dresses, pyjama bottoms etc. Things that were allowed to be baggy and wonky looking. But I wanted to make something I could wear all the time.

I drafted the pattern myself, based on a favourite blouse I already had. I made a few changes. I allowed for the back to come down a lot lower, to allow for my builders butt that often comes out when I'm working in the studio!, I added darts, and I added bias binding around the neck and arm holes. The original top just had a seam and it was a bitch to iron!


(here's a blurry pic showing the length at the back and the lovely drape of the fabric)

(This shows how I made the sleeves thinner and added bias binding)

(Close up of my bias binding. Bit wonky now I look at it. Too scared to use the 
machine on my first attempt at it!!)

Now I was quite naughty. I didn't make up a practice top (muslin?) I had this beautiful silky fabric and only 3 hours. Luckily nothing went wrong and I had almost no wastage or anything like that. I got lucky!


So, things I learned:

-how to do bias binding
-how to hem a curve
-where to put a dart in without a pattern
-that this fabric was lovely to sew with and to stop being scared of anything new and just do it!
-that I'm smaller than I think I am! I tend to allow loads of room for movement, but I've actually lost weight!
-use a zig zag stitch in replacement of an overlocker


Most importantly, this little project has given me more confidence. I am good at sewing. And I'm not saying ti to brag or anything, but it's something I can actually do quite well. After finishing this blouse I had the courage to take in one of my cardigans that I've been meaning to do for ages. Bit scary cutting the sides of the knitting, but it worked and it's lovely now. I may show you that when I get another free evening.


Just remember guys, just do it. If you're afraid of a new technique, just have a go at it anyway. It might be easier than you think, and it'll open up loads of opportunities for you!


Saturday, 9 March 2013

New things...

Hello! Long time no blog!

Sorry everyone, it's been really hectic lately, been back in my home town, been back here, had a birthday, had a hangover, had lots of uni work, had no time for crafts. However, here's something I made before it all went mental...


It's a little pin cushion jar!


You can take the lid off and store your pins too


How useful is that?! I made a bigger one for my mum which was about 8cm in diameter, but these little cuties are only 4cm in diameter, they just fit pins in quite snugly. I made them in a few colours...


I like the pink one the best :)


Monday, 18 February 2013

First order done!

The order from the other day has gone well. All 15 items are made, packed and posted. I also included an extra one that I mocked up for a new design. Hope the lady who ordered them likes them!


Here's a little peek since I'm so pleased with my first official order...


Well I'm super pleased with myself!

Ooh, I'm also close to 100 views! Hooray!

Thursday, 14 February 2013

Contacts...

Hi everyone, if you could all take a look at a lovely little Facebook page that'd be great. It's called seconds away, and they specialize in vintage china. It's all so adorable! They may also be featuring a few of my items as part of a set soon, it depends on how it all goes, but it's looking good :)

So happy!!!

Wednesday, 13 February 2013

FIRST REQUEST!!!

AGHHHHH!

I just had my first request for a batch of personalised keyrings! From a paying customer!

Just thought I should update you all :) :) :) :) :)

AGGGGGGGHHHHHHHHHHHHHH!!!! SO EXCITED!

Friday, 8 February 2013

Two long projects...

Well guys, not much crafting has been going on this week I'm afraid, however I did manage to sell five more of my keyrings! Sad to see them go, they're so cute, don't you think?


(Excuse the giant owl just casually perching at the side of this photo, He's just something new I tried out over the Christmas break.)

This is the collection I had at the start of the day, now five have left! Can't quite believe people actually want to buy them, I've said goodbye to so many now!

Anyway, what else have I been doing? Just carrying on with another long project...


This is the first crochet blanket I started, (hence the utter rubbish bit in the middle) and I kind of keep forgetting about it since I've started and finished other crochet projects. So I'm trying to get it done and show it some love :)

Ooh, and I've tacked all the pieces of my quilt together, but lots more work to go yet!

Monday, 7 January 2013

First things first...

Ok. First proper post, first thing I made.


I make cute keyrings (and lots of other stuff), but somehow I keep ending up back at these keyrings. I have waaaay too many of these. I make them just to relax from uni work, and they are quick and easy to make so an afternoon sewing can turn into maybe 10 or 15 of these little things!


I also tend to make too many owls. I do attempt to sell them on ebay (my name on there is pasta-and-cheese if anyone's interested!). I love my little owls, I like to mix the colours and try things out that aren't just felt. I've used felt, denim and cotton. If anyone has any ideas of other fabrics I could try out then leave a comment and I'll have a go :)
 
I shall update when possible, I am usually snowed under with university work, but I will cpend my chill time trying to keep you all in the know, bye for now!
 

Here we go...

Well, this is my first post to my blog. I'll admit, I have no idea how to add photos, or change any of the sections on here, but I thought I may as well write something.

Basically, this page is just a place for me to write and document the stuff I make, and for people to have a gander at if they so choose. I know I like to have a nosey at other peoples crafty bits and bobs, so maybe some of you will find mine interesting too!

Anyway, I'm off to attempt to bulk this page out, and not just look like a creepy lurker with an abandoned page.

Blog soon! ( if I figure it out ;) )